![]()
The “Illegal” Settings That Fixed My Stream Quality

For weeks, I felt like I was viewing my own live stream through a layer of dirty glass.
These are the settings I use for Meet in the Middle, a show I stream on Substack with my wife and a close friend.
If you are looking to stream directly from your desktop to Substack, this guide is for you.
I had the right gear: a solid PC, a powerful NVIDIA GPU, and a good internet connection. I followed the “Gold Standard” tutorials to the letter. I locked my frame rate to a perfect 30. I left the advanced settings on default because every YouTuber said, “Don’t touch what you don’t understand.”

But when I watched my VODs back, the magic was gone. The movement, which felt buttery smooth on my monitor, had a weird, rhythmic micro-stutter on the stream. The quality just didn’t match the hardware I paid for.
It turns out that the “default” settings are designed for compatibility with 10-year-old laptops, not modern PCs.
So, I started experimenting. I matched the math on my frame rates. I dialed in my NVIDIA encoder. I even checked the box that allows you to Substack’s “recommended” limits.
The result? The stutter vanished and the image sharpened up.
If you are running an NVIDIA setup and your stream feels slightly off, you might be stuck in the same “safety trap” I was. Here is exactly how I configured OBS to get smooth motion and sharp visuals by ignoring the manual.
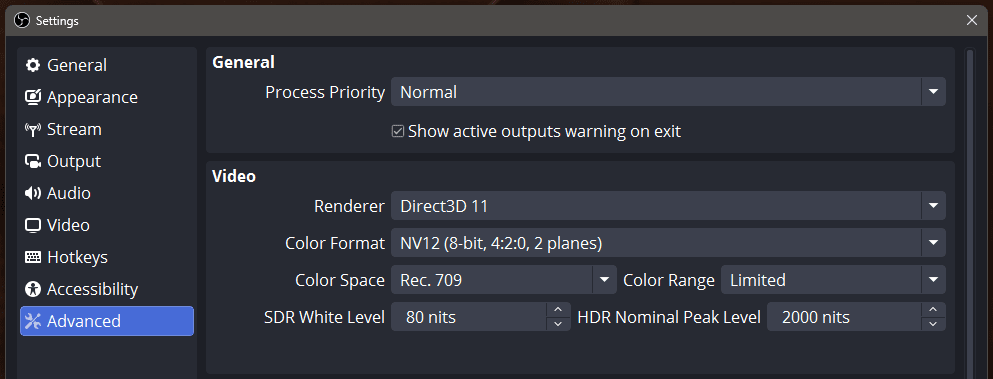
1. The “Color Truth” (Why you stick to Limited)
There is a lot of bad advice out there telling you to switch your color range to “Full” because it sounds “more complete.” Don’t do it.
Streaming platforms like Twitch and YouTube are built on TV broadcasting standards. They expect a Limited Color Range (16-235). Substack uses MUX, which follows these same rules.
If you force your output to “Full” (0-255), your stream might look high-contrast on your monitor, but for your viewers, the dark areas will be completely crushed. Shadows will vanish, and the whole stream will look dark and muddy.
The Fix:
Go to Settings > Advanced.
Ensure Color Format is set to NV12 (the most compatible format).
Set Color Space to Rec. 709 (Standard for HD content).
Crucially: Keep Color Range on Limited.
This ensures that what you see on your preview screen is exactly what your viewers get on their devices: accurate, visible, and professional.
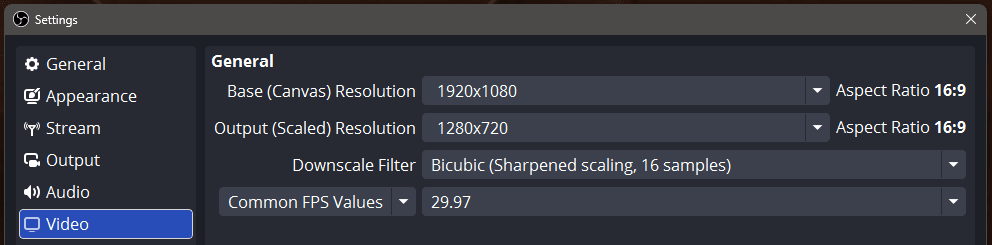
2. The Stutter Fix (Why 30 FPS is a Lie)
This is the most controversial tweak, but it is the one that makes the biggest difference for smoothness.
We are trained to believe that “30 FPS” or “60 FPS” are the holy grails. But if you are using professional cameras or capture cards, your source is likely outputting at 59.94 Hz (NTSC broadcast standard), not a perfect 60.00.
If you force OBS to stream at a flat 30 FPS while receiving a 59.94 signal, it has to “guess” frames to fill the gap. This causes micro-stuttering, that subtle jitter that makes the stream feel cheap.
The Fix:
Go to Settings > Video.
Change Common FPS Values to Fractional FPS Values.
Set the value to 29.97.
Mathematically matching your frame rate to the source creates “butter smooth” motion that round numbers often miss.
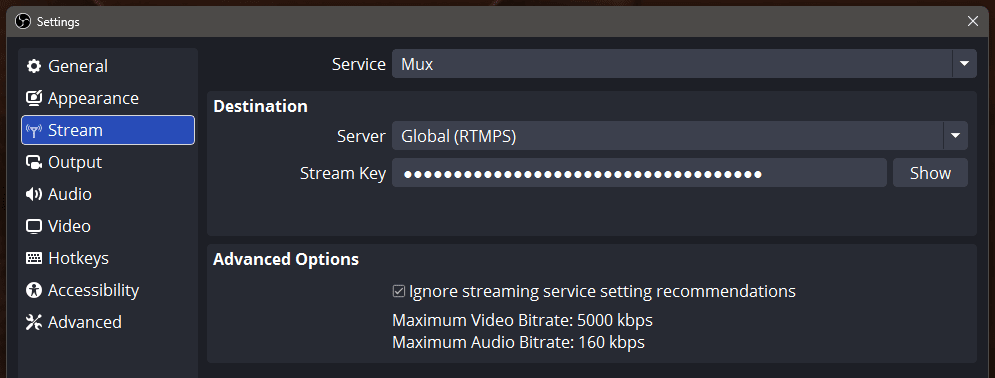
3. The “Illegal” Quality Boost
Twitch, Mux and other platforms have “Recommended Settings.” They act like strict speed limits, but they are actually just suggestions to save their bandwidth.
If you have a decent internet upload speed, you can and should bypass these guardrails to get better audio or slightly higher video overhead. OBS has a hidden toggle that stops it from holding you back.
The Fix:
Go to Settings > Stream.
Choose the Service > Mux and Server > Global (RTMPS)
Check the box: “Ignore streaming service setting recommendations.”
This simple toggle allows you to push your audio bitrate higher or push your video bitrate past the “soft limits” if you need to reduce pixelation. If you don’t see MUX, then select “Show All…” and it will show up as an option.
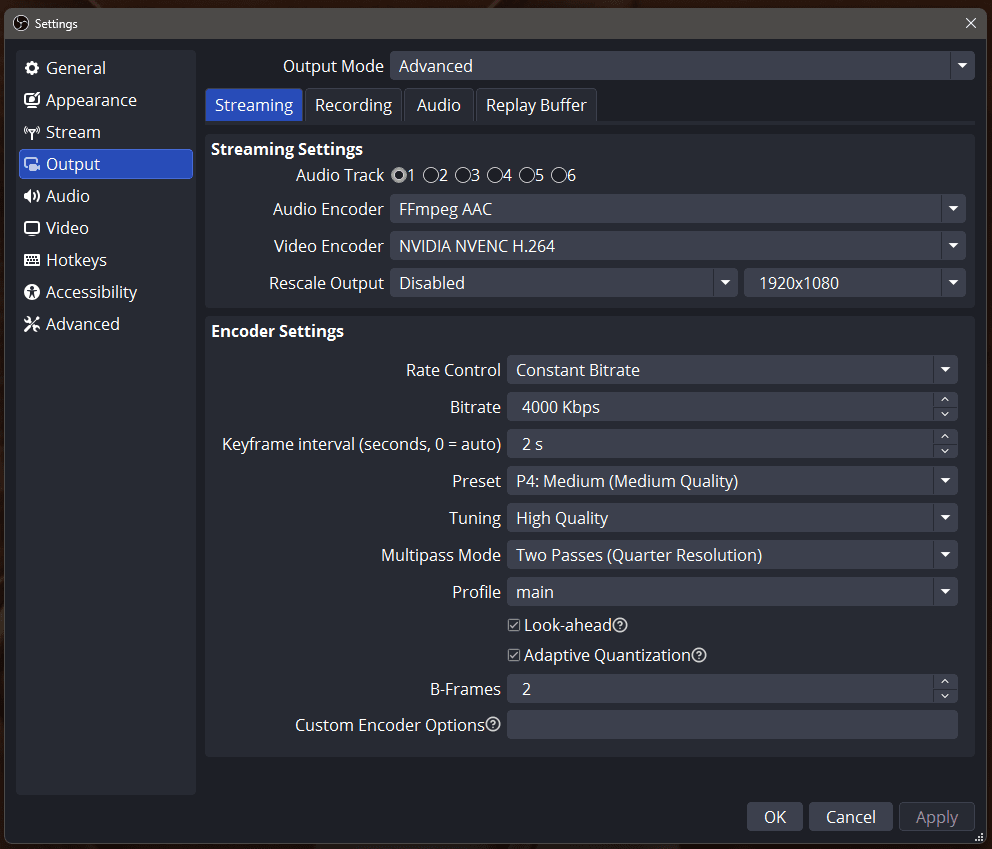
4. The NVIDIA Secret Sauce (NVENC)
Since I stream with an NVIDIA GPU, I don’t use the CPU (x264) to encode. I use the dedicated NVENC chip. This takes the load off my computer so my stream doesn’t lag.
But simply selecting “NVENC” isn’t enough. You need to dial it in for efficiency.
The Fix:
Go to Settings > Output.
Profile: Set this to
main. This ensures maximum compatibility with different players.Multipass Mode: Set this to “Two Passes (Quarter Resolution).” This allows the GPU to analyze the frame twice for better quality without the massive performance hit of “Full Resolution.”
Adaptive Quantization: Check this box. This allows the encoder to intelligently distribute quality to different parts of the frame to reduce blockiness.
Look Ahead: Check this box. This helps utilize more of the GPU than the CPU to handle stress better.
Bitrate: For 720p streaming (as seen in my Video tab), 4000 Kbps is the sweet spot. It provides a crisp image without wasting data if your upload speed can handle it.
Conclusion
These settings work for me, so check your ISP’s upload speed is above 5 Mbps (5000 Kbps) on Speedtest.net and set your bitrate to at most 80% of the speed but no higher than 4000 Kbps.
Streaming is not “plug and play.” The default settings in OBS are overly safe, often leading to a stuttery or washed-out experience.
By respecting the broadcast standards (Limited Color), matching your framerate math (29.97), and ignoring the platform’s “safety rails,” you stop fighting the software and start streaming the quality your hardware is actually capable of.
If you have the bandwidth, just copy my settings and try them for one stream. Your viewers will notice the difference.
If you find value in this post, consider subscribing. You control your inbox and will be able to choose what you read.
Venga!
Mark (VengaDragon)
P.S. Feel free to message me or leave a comment if you need to know where to find OBS Studio, it’s free and I have been using it for over a decade.